Friday, December 22, 2006

Arrrg

It's really be a great day. It started with a mad dash around the house to make it presentable enough for company! My Visiting Teachers were coming! YAY!! I was so excited when they got here *JUST* as I was putting our breakfast bowls in the sink. (Got to put that chore off for an hour or so! Yay again!) It was really great to see them, but lo and behold, it got better...

My husband called! Yay Tim!

So half the Visiting Teaching time was taken up with me on the phone with Tim, and them hollering things at me to tell him! It was of course a ton of fun, and it helped that Tim was in a good mood. I guess things are going OK "over there" where ever "over there" is! lol. He doesn't talk much about things there, and keeps changing the subject to home matters. Excape comes in many forms I suppose! Anyway we are all so VERY proud of him. He's a one of a kind guy and just as sweet as can be. (Though he'd probably cringe if he could read this right now! lol!!)

Anywhoo...

I was so stinkin' excited for them to get their gifts I couldn't stand it. I handed them over just as soon as their butts hit leather! lol. They really liked them! YAY ME! Of course at this point they wanna know how I made them, and I just *HAD* to show them my new toy in my newly organized craft room! lol. After we ooooh'ed and ahhhhh'ed over the Cricut we went back in the other room and got to talking and all that fun stuff! What a great lesson we had this morning too! I really do love these sisters. They bring the warmth of the spirit into my home and that's a treasure beyond price!

Anyway, Angie liked hers well enough I'm going to make one for her mother's birthday! Yay! How cool is that?! Since I'm going to do the exact same thing I did for theirs I won't post my exaples again! Not to worry though. I do have a card sample that I made tonight!

I have been trying to get a bunch of mechanics cards made to take into the local stamping/scrapbooking store. We've been in negotiations about my maybe teaching there. I'm trying not to talk about it because I don't wanna jinx myself, just keep everything crossed for me! I plan on going in tomorrow afternoon.

So tonight my mechanical card was the Revolving Door Card. If you want instructions on this one you'll have to email me and I'll share, but I don't feel like typing that much more tonight.

Here's the recipe for the card:

Stamps: Ahoy Matey, Matey's Map, Rough Edges Alphabet
Paper: Ballet Blue, More Mustard, Whisper White
Ink: Close to Cocoa, More Mustard, White Craft
Accessories: Sponge Daubers, Prisma Colored Pencils, Gamasol

I tried something new tonight, in that I used Prisma Colored Pencils and Gamasol to do my watercoloring. I'm not too hot at it yet, but I managed to get things colored in, which is more than I expected to be able to do! For a tutorial on using Prisma Colored Pencils and Gamasol click here.

Gamasol is a brand name of odorless mineral spirits. It can be found at HL, Mike's, and WMart to name a few. Look around! Lots of fun! I'm going to keep practicing, and eventually will be boasting about it here! lol!

So I guess I'd better get off here. I want to make a waterfall card for tomorrow. I think I'll start it to night (the mechanics and all that) then stamp it up tomorrow. More than likely I'll get involved though and just do it all tonight!

Remember to keep your digits crossed for me! I could stand to start teaching again!

Feel Compelled to Share

For some time now I've been playing around with making a book of me. I scrap Tim and the kiddo and the dog all the time. I even scrapbook my nephew, my parents and other family members, but have not done any GOOD scrapbooking about myself in over a year now. Here's today's challenge to myself: GET SOME DONE!

The major part I have complete so far is a page that says: "What I'd Tell a 13 Year Old Me." And here's my list. I'd love to know what you would tell yourself at 13 if you could! Post them incase I need to tell myself that too!

1. Being tall with curly hair are assets.
2. Boobs are NOT an asset, stop praying for them!
3. Be PROUD of the things that make you different, its those very things that you'll be most grateful for when you're 26
4. Everyone is just as uncomfortable with themselves as you are this very second.
5. Acne isn't a death sentence
6. Boys are fine in small doses. You don't have to have a boyfriend to feel pretty or be cared about.
7. Love will find you! There REALLY is someone who was meant just for you! Your marriage will be strong enough to survive the stress of wars and stinky feet; and will be a happy refuge from the rest of the world.
8. Great metabolism doesn't last forever! Prepare yourself for size 22/24! Its not the end of the world, and it will pass, but be prepared to say good bye to 130 lbs forever!
9. Don't take yourself so seriously! So what if you get in trouble? You'll be able to say you did something foolish once...
10. Living is made a life by the little things.
11. Stay away from After Shock! Cinnamon will NEVER taste or smell good again!!!
12. Home is where ever you make it.
13. You will never have the same type of relationship with your mother that your sister has. You will have your own type of relationship with her, and it will be beautiful!
14. You may never get along with your sister, but will always be there for each other in times of need and chocolate withdrawals.
15. You are so much stronger and smarter than you give yourself credit for!
16. There are many forms of beauty in this world - seek beauty in all its varieties.

Now I guess the trick is to get my 13 year old self to LISTEN and BELIEVE my list - right?!

What would YOU tell yourself? Please share!!

Thursday, December 21, 2006

Pop Up Polka Dots & Paisley

Go ahead, say that ten times fast!!

LOL, its late, so forgive my horrible humor. I stayed up to make another card with the scraps from the Visiting Teaching gifts (see the post below this one!) All the colors are the same. I'm really enjoying this color combo! I used the Polka Dots & Paisley stamp set. To get the dots all lined up correctly I used the Stamp-a-ma-Jig. I really don't know what I would do without that silly thing! I use it all the time - and it has earned its place on my favorite things list!
If you want directions for the pop up card then email me, and I'll send them to you. I don't know where my upline got the origional instructions from, but like any good stamper I tweak this and change that. If you know where the origional instructions came from, please feel free to let me know so I can give credit where credit is due!!

In addition to all that cardstock I used jute twine and a buckle from the Hodgepodge Hardware. It's actually the first piece of hardware I've used since I bought the kit; my new resolution (as of right this second) is to stop hording all my goodies! So be prepared to see more metals on my cards!

Alright. That's it for me tonight. I really do have to go to bed. I get to give away my goodies first thing in the morning! (Keep your fingers crossed that they like them!!)

Visiting Teaching Gifts

Today I spent the day doing Visitng Teaching. That's where my compainion and I go to the homes of a few ladies in our church. It's meant as a time to reach out to our sisters and grow a stronger bond within each other and with Heavenly Father. It really was a special time today, and I have to admit, there were times that I cried. The women I visit teach are some of the most beautiful souls I've ever had the pleasure to meet, and I know that I am truely blessed by having them a part of my life.

So tonight I set to making Christmas gifts for my Visiting Teachers. They're a couple of really great ladies, and I so enjoy the time I spend with them every month and at church on Sundays! My hope was to make something that would show a portion of my love for them. That being said I'm keeping my fingers crossed that they enjoy these gifts!

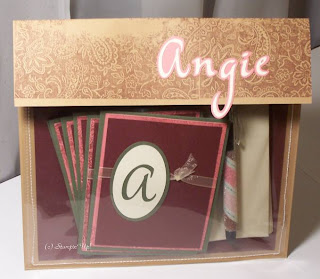
I started off making monogramed cards with their first initials on them. I used Always Artichoke, Bravo Burgundy, Very Vanilla and Rose Red. I cut the letter oval with my cricut using the Jasmine font! I used Bravo Burgundy ink and the Paisley Background stamp on the Rose Red cardstock.

Then, after I made the cards I made beaded pens. If you need instructions on these, go to Splitcoast Stampers (the link is at the very bottom of the page under my mug.)

The last thing I did was make a card pouch to hold all the loot! For this I used 9"x9" page protectors. Cut off the holes and sew it on to a piece of 11.5"x9.5" Creamy Caramel cardstock, leaving the top edge un-sewn. Score and fold the cardstock just above the pocket to make a flap. Decorate the flap. I used velcro dots as a closure.

I really really really hope that they like these. They didn't take too long, and really I think that they turned out rather well. The hardest part is going to be giving them away... OR maybe I should make a set for myself?!

Wednesday, December 20, 2006

Polka Dots & Paisley


I love being a Stampin' Up! demo! For Christmas I (and every other demo) recieved the Polka Dots & Paisley stamp set from the company! This set is soooooo stinkin' cute and I couldn't wait to get started on a project with it!

Hoping for a "different" look I chose three colors I wouldn't normaly put together: Taken with Teal, Tempting Turquoise, and More Mustard. I really like how rich these colors look together! I couldn't believe how well I'd chosen!

There are no tricks or special things here. It's all strait stamping (though I did use my markers on the flowers rather than a stamp pad.) I put a pop dot behind the flower pannel and tucked "happy" under it. The dots in the corners were drawn on with the markers - though I thought about piercing them I think this turned out well.

So... What do you think?

Containing Myself


Ahhhh... Ever create something you're completely happy with? I did tonight. I got to use some of the self adhesive die cuts from Stampin' Up!'s Just Delightful Simply Scrappin' Kit as well as the little bitty bit of paper I had left over from the SAB swap.(That would be the striped paper on top.) In addition to the SS Kit I used "Flirty" ribbon from the Winter Mini and Bashful Blue cardstock. I added the white dots with my Signo Gel Pen all over the Bashful Blue cardstock for a little interest.

On the lid of the box I put Pretty in Pink cardstock stamped randomly with three different stamps from the Delight in Life stamp set (Sell A Bration set) all in Pretty in Pink ink. Add So Saffron brads to the little self adhesive die cut lable. Next I cut the word "Cards" out of Certainly Celery using my Cricut! Add a little Signo Gel Pen and VersaMarker for some depth and I am tickled pink!

Monday, December 18, 2006

Cards Cards Cards Cards....

OK, I stayed up most of the night working. I had that energy, and I couldn't seem to stop myself! I kept looking over at those sad lonely little microscope slides and decided they would be much more comfy nestled on a card rather than just laying around gathering dust. And, since I had a head start on the glitz and glitter, I added more and more and more!

I handed off the other slide to my gal pal Gwen, and we'll have to see what she comes up with for it! I'll make her share!

Other that that card I made candles. Usually I just go ahead and stamp on them, but since I was already having a night of bling I went ahead and embossed with Gold Detail Embossing Powder. WOW! Now you can make up your own mind, but I'm a little worried that the gold is too much?! Is there such a thing? I'd hate to be tacky, so you'll have to let me know what you think! (Be honest, but not hurtful!)

I also worked on a new technique using UTEE... Hmmmm... I know its hard to tell from the picture, but the flower is standing up. Very cute to see in person, loses some of the appeal through the photograph. Trust me, its cute. And this new technique will be added to my Embossing Technique Class. (Email me if you wanna join the class - either in person or through the mail!)

So, the last thing I did was work on a horsey card. I wanted something a little more masculine to send to my husband. This is so simple, but I really like the results. I spent quite a while hemming and hawing between the jute twine and chocolate grosgrain, but the twine won out in the end. I punched the little holes along each corner. Thank goodness for the guide or I never would have gotten them even!

Sunday, December 17, 2006

Snow Under the Microscope..... Slide

Hello there friends! I haven't forgotten you, really! Between the holiday season and weather, and plans for a trip to Ohio things have been a little busy. But never too busy to stamp!

Yesterday my order from Lumpy Stuff arrived. I have been waiting for this box for a while, and am so happy that it's here! Unfortunately I wasn't able to get to it until tonight!

I decided to play with the microscope slides first. They're a little intimidating at first, mostly because I held them in my hand and my mind went TOTALLY blank! Yikes! But I got over it!

I used the Snow Flurries stamp set (recently retired), white StazOn, silver and a few shades of blue alcohol ink. On both slides I stamped a snow flurry in white StazOn randomly on the slide and set aside to dry. I grabbed a blank slide and covered with blue and silver alcohol ink.

For the darker slide I put the slides together and ran foil tape around the outside edges. On the lighter slide I sandwiched a piece of tissue paper between the two slides and then ran the edges of the slides with the foil tape.

It’s hard to tell how sparkly these are by the picture. The silver ink really catches the light beautifully. I'm going to attach pin back on to these and sell them at the upcoming craft fair, debating though how much to charge for these!

The other project I've been working on is Tea Bag Holders. Instructions for these cute little cards can be found on Split Coast Stampers. I'm going to keep tweaking these, but I thought they would come in handy in this season where everyone is getting sick. The tea enclosed is honey lemon - great for those sore throats.

My third recent project has been beaded inkpens using the paper from the winter mini catalog. I'll have to come back later and add pictures!

Until then though, have a safe and happy holiday season!

-Merr

Saturday, December 2, 2006

Snow Day

Recently Missouri has received our first snow and it was a NICE one! The storm came first as rain that froze over night. All through the next day we got freezing rain and sleet! Poor David waited as patiently as possible for the snow to play in! Finally over night the snow fell so we woke up December first to SNOW! Yippee! Needless to say Davy was out in it as much as possible!

To commemorate this great first snow, I put together an accordion album. If it seems small that's because IT IS! This mini-accordion book I got at Dub and Sam and I LOVE it! It's small, but that's the point, right? Anyway, I actually bought quite a few of these babies and I'm looking forward to sending them out to the grandparents for small Christmas gifts!

Anyway... back on track...

I started by cutting Stampin' Up!'s Bashful Blue card stock into eight 2 1/2 x 3 1/2 rectangles. I went ahead and attached them before I decorated them, but next time I think I'll decorate first, and attach last!

Next, I stamped snowflakes all over the panels using white craft ink. I only embossed the panel for the front of the book since I have no patients! (On the cover I embossed with Iridescent Ice EP from Stampin' Up!) After the flurries were dried, I went back and sponged on some Bashful Blue ink around all four edges of the panels to give it that "frosted" look.

I used the snowmen from the Festive Favorites stamp set in Bashful Blue on white cardstock; and cut them out because the stamp was too wide for my little mini-book! I inked the edges of the image and embossed with more Iridescent Ice! I also used the little snowman tag from the Festive Favorites set - Bashful Blue on white again! I colored all the hats and scarves in on the snowmen with my (you guessed it!) Bashful Blue marker. On the little tag I used Bashful Blue (who'd a thunk?!) pastels around the snowman to make him seem more white.

I printed all my pictures out on the computer to about 2"x3"; and matted them on Ballet Blue cardstock which I inked around the edges with white craft ink. After they dried I adhered them in the book along with the little poem. I got the poem at my FAVORITE poem and quote site Denny's Poems and Quotes! There are literally MILLIONS of ideas on this site, and well worth a visit!

Anyway, because I'm sure you can't read the poem it says: "Little Nose/ Where did you get that little red nose?/Jack Frost kissed it I suppose./He kissed it once, he kissed it twice/Poor little nose, it’s as cold as ice!" Isn't that cute?! And so fittings since all the pictures in the book were taken of Davy with a pretty red nose and cheeks!

The last thing I did was finish the cover. I used the Stamp-A-Ma-Jig to place my letters just right. (I used Ballet Blue for the ink.) The last thing I did was stamp a flurry on the ballet blue with the white ink and the punched it out using the 3/4" punch. I punched a hole in the center, attached my eyelet and threaded my elastic band through the hole.

Guess what, that's it!! Not too bad!

Anyway, I hope you like the book, and check back soon to see what I've been up to!

-Merr